
Water Heater Leaking: What Homeowners Should Do Now
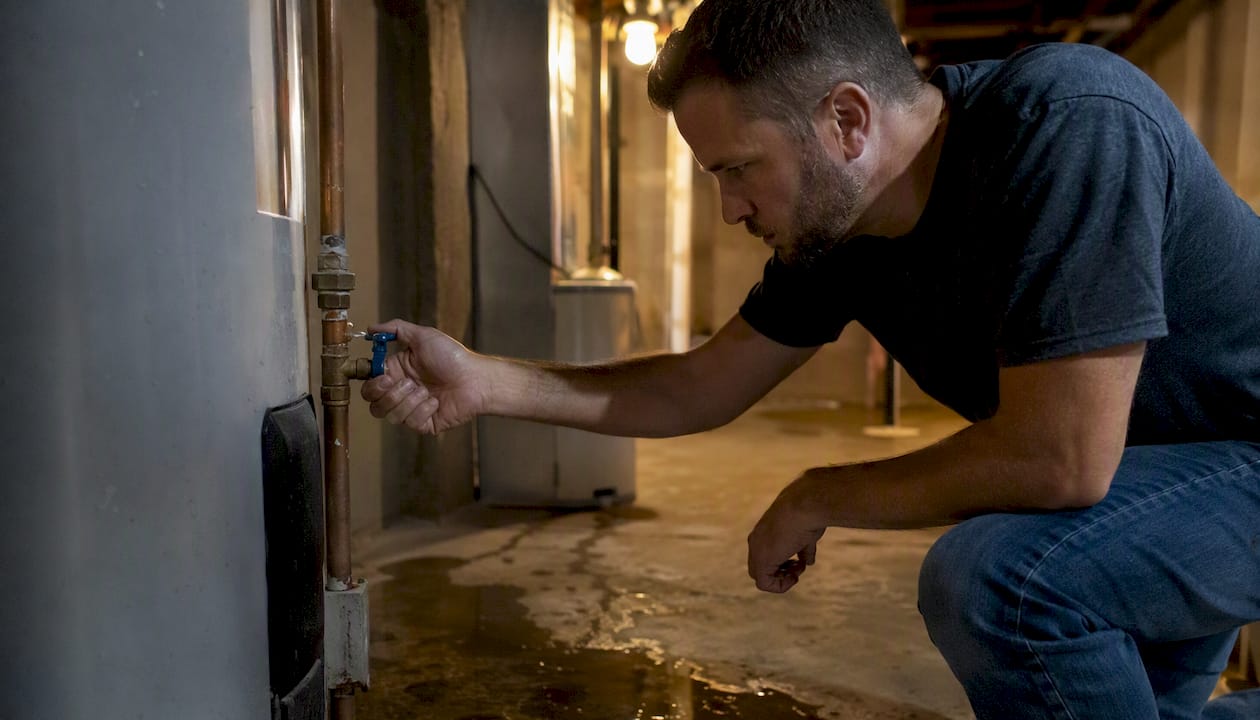
If your water heater is leaking, shut off the cold-water supply valve to the unit first, then cut power at the breaker (electric) or turn the gas control knob to the PILOT or OFF position. Do those two things before anything else.
The short verdict: a leak from a valve, fitting, or drain valve is often repairable. A leak from the tank body itself, especially at a seam or under the insulation jacket, almost always means the unit needs to be replaced. Water pooling directly under the tank is the clearest signal that replacement is coming.
Pro Tip: Before you call anyone, dry the outside of the tank with a towel and watch for 15–20 minutes. Condensation forms in beads that evaporate once the tank warms up. A real leak either grows or leaves a wet trail you can trace back to a specific fitting, valve, or seam. A. O. Smith’s guidance notes that condensation typically appears during cold-water refill and disappears once the tank reaches temperature, timing is the tell.
Key Takeaways
A water heater leaking from a valve or fitting is often repairable; a leak from the tank body almost always requires full replacement, especially on units over 10 years old.
Point | Details |
Shut off water and power first | Turn the cold-water supply valve clockwise and cut the breaker or gas control before doing anything else. |
Trace the leak top to bottom | Dry the tank and use paper towels at each fitting to find the true source before assuming tank failure. |
Repair vs. replace decision | Repair valves and fittings on units under 8–10 years old; replace when the tank body is corroded or multiple components are failing. |
Typical cost range | Valve and fitting repairs run $100–$300; full tank replacement installed typically runs —. |
Txcomfortcrew | Provides licensed on-site diagnosis, repair, and replacement across the Greater San Antonio area with transparent estimates and a repair-first approach. |
Table of Contents
What to do right now if your water heater is leaking
Speed matters. Water near electrical components or a gas valve is a genuine hazard, and even a slow drip can soak subfloor material in hours. Follow these steps in order.
Turn off the cold-water supply. The shutoff valve sits on the cold-water inlet pipe above or beside the unit. Turn it clockwise until it stops. If you can’t find it or it won’t budge, use the whole-house shutoff instead.
Cut power or gas. For electric heaters, flip the dedicated breaker in your panel. For gas, rotate the control knob to PILOT or OFF. Never leave a gas heater energized while water is pooling near the burner assembly.
Smell gas? Stop everything and leave. Don’t flip switches, don’t use your phone inside the house. Get outside and call your gas utility or 911 from the street.
Contain the water. Attach a garden hose to the drain valve at the base of the tank and route it to a floor drain, utility sink, or outdoors. If the leak is minor, towels and a bucket work fine. A wet/dry vacuum pulls standing water off the floor fast.
Document before you touch anything. Take photos and a short video of the leak location, any rust staining, and the unit’s data plate (brand, model, serial number, install date). Documenting the source helps technicians give accurate remote estimates and supports insurance claims if water damage is significant.
Do not cap or plug the T&P valve. The temperature and pressure relief valve is a safety device. Blocking it can cause the tank to rupture under pressure.
Stay off wet floors near gas appliances. Wet surfaces near a gas line or burner are a slip and ignition risk simultaneously.
A note on electrical hazards: if water has reached the area around the wiring connections on an electric heater, treat it as an emergency. Don’t touch the unit until the breaker is confirmed off and the area is dry.
How to find where the leak is actually coming from
A puddle on the floor doesn’t tell you much by itself. Water runs downward, so a drip from a top fitting can travel the full height of the tank before hitting the floor. Manufacturer guidance from Whirlpool recommends drying the unit completely, removing any pipe insulation, and pressing dry paper towels against each fitting and connection in sequence to find which one gets wet first.
Work top to bottom:
Start at the top. Check the cold-water inlet and hot-water outlet connections. These are threaded fittings that can loosen over time, especially in areas with hard water. Press a paper towel against each one and hold it for 30 seconds.
Check the T&P valve and discharge pipe. The temperature and pressure relief valve typically sits on the side near the top. If the discharge pipe is dripping or the valve body is wet, the valve may be weeping due to excess pressure rather than a faulty valve itself. Don’t assume the valve is bad until you’ve ruled out thermal expansion or high incoming pressure.
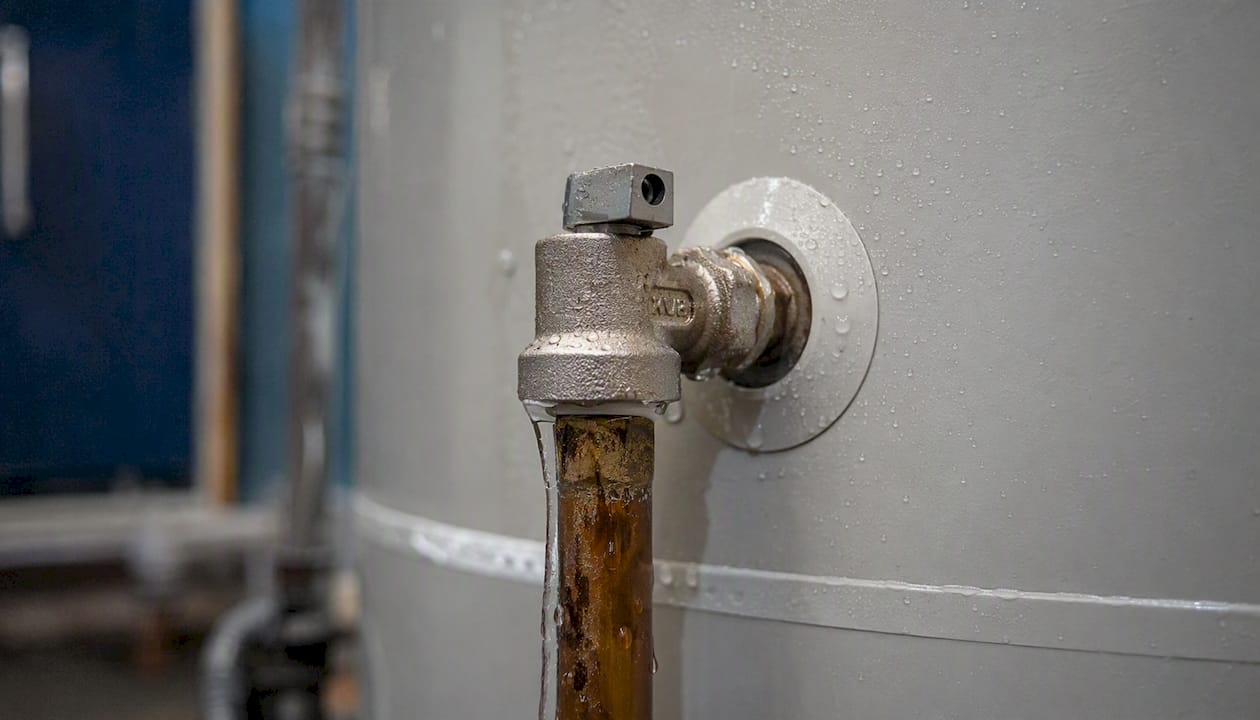
Inspect the drain valve. It’s near the bottom of the tank. Plastic drain valves are common on older units and are a frequent leak point. Press a towel around the base of the valve and the threads.
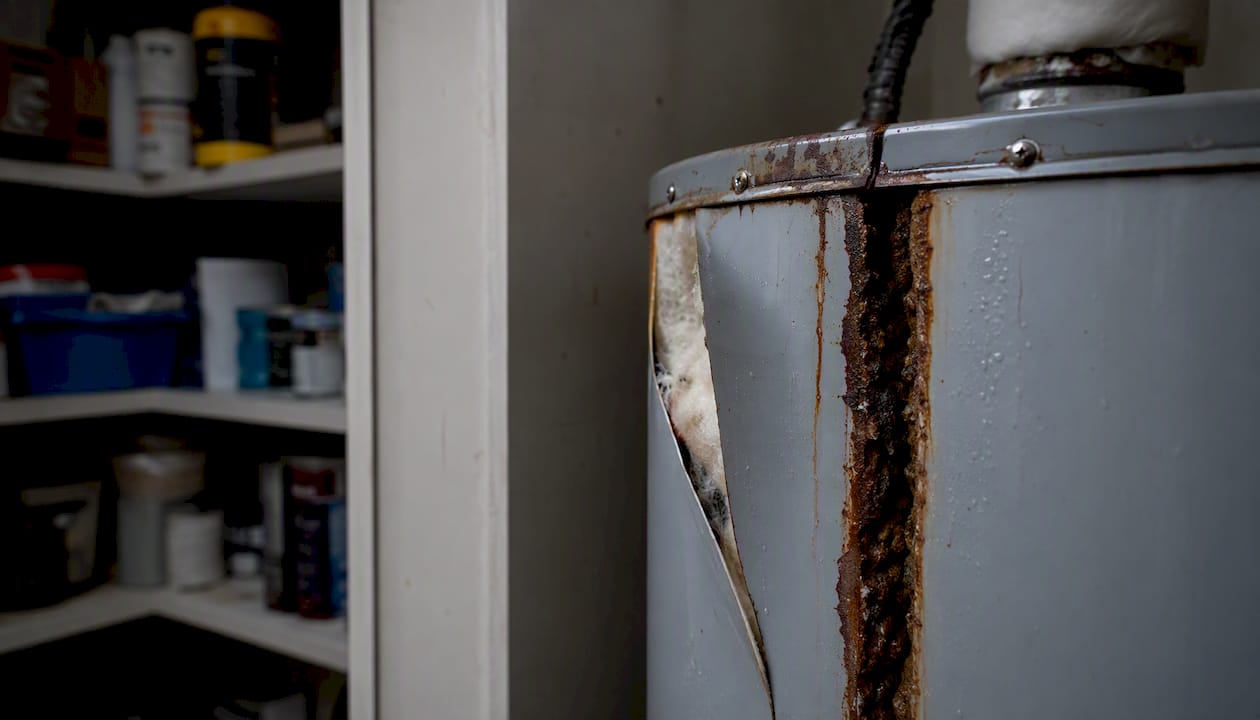
Look under the insulation jacket. Moisture under the outer jacket, rust staining at seams, or a damp smell from the base of the tank are signs of internal corrosion. A careful top-to-bottom inspection often reveals that water pooling at the base is tracking down from a higher fitting rather than coming directly from the tank itself, but if the jacket is wet and no external fitting is the source, the tank wall is likely compromised.
Pro Tip: If you can’t stop the inflow of water, smell gas, or see water contacting electrical wiring, stop diagnosing and call a licensed plumber. Some situations aren’t safe to troubleshoot alone.
Common reasons a water heater leaks
Most leaks trace back to one of five causes. Knowing which one you’re dealing with tells you whether you’re looking at a $30 part or a full replacement.
T&P valve discharge. The temperature and pressure relief valve opens when tank pressure or temperature exceeds safe limits. A weeping T&P valve is sometimes a sign of thermal expansion from a closed water system, not a defective valve. Repeated T&P discharge usually traces to high incoming pressure or a closed system without an expansion tank, and the right fix is a pressure reducing valve or expansion tank, not just swapping the T&P valve.
Failing drain valve. Plastic drain valves degrade over time. They may weep at the threads or drip from the valve body. This is one of the most common and most repairable causes of a bottom leak.
Loose inlet/outlet fittings. The threaded connections at the top of the tank can loosen from thermal cycling and water hammer. These are often fixable with a wrench and fresh thread sealant.
Corroded or failed tank. Internal corrosion eats through the tank lining over years, especially in homes with hard water or high sediment. Once the steel tank wall is breached, no repair holds. Pooling water at the tank base often indicates internal corrosion, and a corroded-through tank must be replaced.
Condensation. Not a leak at all. Condensation forms on the outside of a cold tank when humid air contacts it, then evaporates once the water heats up. It’s common in humid climates and during the first heating cycle of the day.
Hard water accelerates nearly all of these. Mineral deposits insulate the bottom of the tank, forcing the burner to work harder and raising temperatures at the steel floor of the tank, which speeds corrosion from the inside out.
Leaks from the top are almost always fittings, valves, or connections, and they’re usually repairable. Leaks from the bottom that trace to the tank body rather than the drain valve are a replacement signal.
Is it safe to keep using water while the heater is leaking?
Short answer: limited cold-water use may be possible if you’ve shut off the heater and the leak has stopped, but avoid drawing hot water until the unit is repaired or replaced.
If the leak is coming from a fitting or valve and you’ve shut the heater off, cold water through the rest of your house is generally unaffected. The risk is using hot water from a tank that’s under reduced pressure or has a compromised valve, which can cause scalding or worsen the leak.
Stop using any water from the heater and call a plumber immediately if:
The leak is continuous and not slowing after shutoff
Water is pooling at the tank base (possible tank failure)
You see any electrical contact with water
You smell gas anywhere near the unit
Simple DIY fixes you can safely try
Some repairs are genuinely within reach for a homeowner with basic tools. Others are not, and the line between them matters.
What you’ll need: adjustable wrench, pipe thread sealant (or Teflon tape), replacement brass drain valve (if the plastic one is leaking), garden hose, bucket.
Turn off water and power first. Every time, no exceptions.
Dry the area and confirm the leak source using the paper-towel method described above.
Tighten loose fittings. A quarter-turn with an adjustable wrench is often enough. Don’t overtighten threaded connections on older pipes.
Replace a leaking plastic drain valve. Drain the tank first (attach a hose, open the valve, let it empty). Unscrew the old valve, wrap the threads with Teflon tape, and thread in a brass replacement. Brass valves are more durable and cost around $10–$15 at any hardware store. The whole job takes 30–45 minutes.
Test the T&P valve carefully. Lift the lever briefly to confirm it reseats and stops flowing. If it continues to drip after testing, the valve may need replacement, but have a licensed plumber evaluate whether the root cause is pressure or expansion rather than the valve itself.
Pro Tip: Use Teflon tape on threaded fittings and pipe thread sealant (pipe dope) on tapered threads. They’re not interchangeable. Pipe dope fills gaps better on larger fittings; Teflon tape works well on smaller threaded connections.
Stop and call a licensed plumber if you encounter any of these:
The leak is at a tank seam, weld, or under the insulation jacket
You see rust or corrosion on the tank body
The gas line or burner assembly is wet
Electrical wiring has contacted water
You can’t stop water from flowing into the tank
Capping or disabling the T&P valve is never a DIY fix. It’s a code violation and a safety hazard.
Should you repair or replace the water heater?
The core rule is straightforward: repair valves and fittings on a younger unit; replace when the tank itself is corroded, the unit is 10 or more years old, or multiple components are failing at once.
A tank’s useful life commonly falls in the 8–12 year range. Age is the primary factor when deciding whether repeated repairs make financial sense.
Run through this checklist before scheduling anything:
How old is the unit? Check the serial number on the data plate. Most manufacturers encode the manufacture date in the first few characters. Under 8 years with a single repairable component: repair. Over 10 years with any tank-body concern: replace.
Where is the leak? Fitting or valve: repair candidate. Tank seam, base, or under the jacket: replace.
Is the water rusty or discolored? Rust-colored hot water means internal corrosion is advanced.
Is the anode rod depleted? A severely corroded anode rod means the tank lining has been unprotected, likely for years.
Are multiple things failing? A drain valve, a T&P valve, and sediment noise together suggest the unit is near end of life.
What’s the repair cost vs. replacement cost? If repair runs more than 50% of a new unit’s installed price, replacement is almost always the better investment.
Is the unit still under warranty? Check the paperwork. Some manufacturers cover tank failure for 6–12 years.
Practical repairs like drain valve replacement often restore a unit that has many useful years left. Repairing a corroded tank, on the other hand, only delays replacement and is unsafe.
What repairs and replacements typically cost in 2026
Costs vary by region, unit size, and whether the job requires a permit or code upgrade. These are typical ranges for the San Antonio area and comparable markets.
2026 cost guidance confirms that repair is economical for fittings and valves, while full replacement installed runs substantially higher and often makes more financial sense for older or corroded tanks.
Permits are often required for full replacements and may add $50–$150 depending on your municipality. If your home’s plumbing or electrical doesn’t meet current code, the installer may need to bring those systems up to standard before completing the job, which can add to the total.
Check your warranty paperwork before authorizing any replacement. Some manufacturers cover tank failure for up to 12 years, and a valid warranty can offset replacement costs significantly.
Maintenance that prevents most leaks
Most water heater leaks are preventable with a consistent annual routine. The tasks aren’t complicated, but they’re easy to skip until something goes wrong.
Flush the tank annually. Sediment settles at the bottom of the tank and accelerates corrosion. Annual flushing reduces buildup and lowers the chance of tank failure over time. Attach a hose to the drain valve, open it, and let it run until the water clears.
Inspect the anode rod every 3–5 years. The anode rod sacrifices itself to protect the tank lining. When it’s depleted, corrosion attacks the steel. Replacement costs $20–$50 for the part and is worth doing on any unit under 10 years old.
Test the T&P valve once a year. Lift the lever briefly and confirm it reseats cleanly. If it drips afterward, have it evaluated by a plumber.
Check fittings and the drain valve during seasonal inspections. Look for mineral buildup, corrosion, or any sign of weeping at threaded connections.
Consider a pressure reducing valve (PRV) if your incoming pressure exceeds 80 psi. High pressure stresses every component in the system, including the T&P valve and tank fittings. A PRV typically costs $200–$400 installed.
Add a thermal expansion tank if you have a closed water system. Closed systems (common with backflow preventers) have no place for expanding hot water to go, which drives up tank pressure and causes repeated T&P discharge.
Pro Tip: Reducing hot water use lowers how often the tank cycles, which reduces thermal stress on the tank and fittings over time. Shorter showers, cold-water laundry cycles, and low-flow fixtures all extend equipment life.
If you don’t have a floor drain near the heater or the drain valve is seized, bring in a plumber for the annual flush rather than skipping it.
How to choose a plumber and what to ask when they arrive
Not every technician who shows up will give you an honest assessment. Knowing what to look for protects you from unnecessary replacements and vague estimates.
What to look for:
A valid state plumbing license (verifiable through your state licensing board)
General liability insurance and workers’ compensation
Positive local reviews with specific, detailed feedback
A written estimate before any work begins
Clear warranty terms on both parts and labor
Questions to ask on arrival:
What’s your diagnosis, and what’s causing the leak?
Do you recommend repair or replacement, and why?
Can I see an itemized estimate?
How long will the job take, and when can you start?
What warranty do you offer on parts and labor?
Will this job require a permit, and will you handle it?
Pro Tip: If a technician recommends full replacement on a unit under 8 years old without a clear explanation of why repair isn’t viable, ask them to show you the specific failure point. A corroded tank seam or a failed heating element are legitimate reasons. “It’s old” on a 6-year-old unit is not.
Red flags to watch for:
No license or unwillingness to provide license number
Pressure to decide immediately without a written estimate
Vague diagnosis (“the whole system is shot”) with no specific evidence
Quoting replacement only without evaluating whether repair is possible
Red flags that mean your water heater needs to go now
Some leak situations aren’t a repair decision. They’re a safety call.
Pooling water under the jacket or visible rust at the tank seams usually means internal corrosion has reached the steel wall. At that point, replacement is the safe choice, not a repair.
Urgent red flags that indicate likely replacement:
Leak at a tank seam, weld point, or directly under the insulation jacket
Rust-colored or discolored hot water
Persistent T&P discharge after addressing pressure or expansion issues
Multiple failing components on the same unit (drain valve, T&P valve, heating element)
Unit age beyond the typical 8–12 year service life
Heavy sediment noise (rumbling or popping) during heating cycles
A water heater that leaks from the tank body is not a candidate for patching. Internal corrosion compromises the structural integrity of the steel tank, and any repair is temporary at best. Manufacturer guidance is direct on this point: once a tank is corroded through, replacement is the only safe option.
If you see any of these red flags, take these steps immediately:
Shut off the cold-water supply to the heater
Cut power at the breaker or set the gas control to OFF
Don’t use hot water from the unit
Call a licensed plumber, not a handyman
How Txcomfortcrew approaches a leaking water heater
At Txcomfortcrew, the first call is always triage: contain the water, confirm the power or gas is off, and get eyes on the actual leak source before recommending anything. A puddle on the floor isn’t a diagnosis.
The approach is repair-first when the unit is young and the failure is isolated to a valve or fitting. When the tank itself is corroded, when the unit is past its service life, or when multiple components are failing together, an honest replacement recommendation is the right call, and Txcomfortcrew gives homeowners a clear, itemized quote so they can make that decision with full information. Membership plans are also available for homeowners who want scheduled preventive maintenance to catch problems before they become emergencies.
Txcomfortcrew is ready when you need on-site help
When a water heater leak can’t wait, Txcomfortcrew provides on-site diagnosis, valve and fitting repairs, full water heater replacement, and cleanup coordination for homeowners across the Greater San Antonio area.

Licensed technicians arrive with a clear process: inspect the unit, identify the exact failure point, and give you a written estimate before touching anything. No vague assessments, no pressure to replace when repair is the right answer. If you’re in Live Oak, Cibolo, Leon Valley, or anywhere else in the Greater San Antonio area, check Txcomfortcrew’s service areas to confirm coverage. Membership plans through Txcomfortcrew’s membership program include annual maintenance visits that catch failing valves and sediment buildup before they become a flooded utility room. Visit the plumbing services page to schedule service or request a same-day estimate.
Sources
These are the primary references used to build this guide. If you’re calling a technician, pull up the unit’s data plate (brand, model, serial number) and have it ready.
Consult your unit’s owner’s manual for model-specific maintenance intervals. If you no longer have the manual, the manufacturer’s website typically hosts PDF versions searchable by model number.
Recommended
Comments